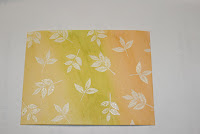
This is from the technique challenge given on Monday for Splitcoast Stampers. The technique is called Batik. You may have seen this on clothing. Here is a bit of info about it...
Originated in India, the art of batik has come a long way from a mere handicraft. The word batik actually means 'wax writing'. It is a way of decorating cloth by covering a part of it with a coat of wax and then dyeing the cloth. The waxed areas keep their original color and when the wax is removed the contrast between the dyed and undyed areas makes the pattern.
Here is a link of different batik sarong patterns for inspiration
My batiking was done a bit differently than the directions given on Splitcoast. Mainly because I am cheap. I didn't want to waste materials or have to buy something new to do this. So mine may look a bit different than others. The idea is relatively the same. Here is what I did:
 * Using watercolor paper, I stamped my leaf images in VERSAMARK.
* I then applied CLEAR EMBOSSING POWDER
 * Using a heating tool, I heat set the embossing material until the images are shiny in appearance. Make sure to check this as I have sometimes found it hard to see if all areas are thoroughly melted when on white paper.
This next step is where mine differs slightly. The original directions call for spritzing bottles
 I did not have spritzers nor did I want to have to use as much reinker as would be needed to spray from the bottle (even diluted). So I placed a few drops in each well and dipped my watercolor brush in water, then reinker and....
....
 swiped each color across my canvas of paper. I used 3 colors...really rust, old olive and more mustard. I found out that I didn't have a really rust reinker(try to say that fast 10 times:) so I simply "colored" the inside of my well and then dipped my wet brush onto the color. It took a bit longer and I don't think the color is as intense. But, it worked.
*Now wait for this to dry.

* Ok, Whatever! I could not wait. So, I sped the drying time up with my heat gun.

* Now place the paper between 2 sheets of copy paper and iron WITHOUT steam. Continue ironing until all of the embossing material has melted off of the watercolor paper and onto the copy paper. The copy paper is used to protect your iron. So, don't skip that part.

* This is what the top of your copy paper should look like.
I hope you try this technique. There are so many different possibilities with this.
Ok, off for more stamping and crafting. I hope you get to create this weekend.


No comments:
Post a Comment